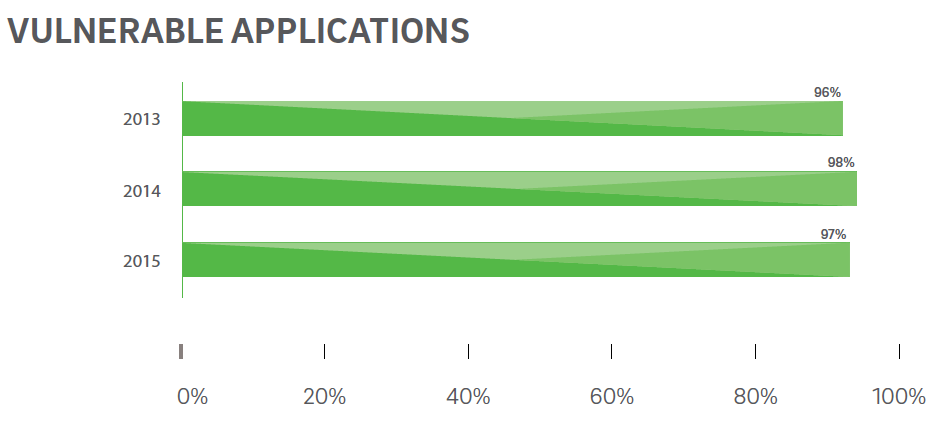
97% of applications tested by TrustWave was vulnerable to one or more security risk. This blog post is in collaboration with Detectify.
Web application vulnerability may cause business and reputational loss to the company if not remediated on time. The sad truth is most of the websites are vulnerable most of the time. An interesting report by White Hat Security shows average days to fix the vulnerability by industry.
How do you ensure you are aware of known and unknown vulnerabilities in your web applications? There are many cloud-based security scanners to help you with that. In this article, I will talk about one of the most promising SaaS platform – Detectify. Detectify integrates with your development process to find the security risk at an early stage (staging/non-production environment), so you mitigate them before go-live. Development integration is just one of the many excellent features and optional if you don’t have a staging environment. Detectify uses an internally built crawler to crawl your website and optimize the test based on technologies used in the web applications. Once crawled, your website is tested for more than 500 vulnerabilities, including OWASP top 10, and give you an actionable report of each finding.
Detectify Features
Some of the worth mentioning features are: Reporting – you can export the scan results as a summary or a full report. You have an option to export as PDF, JSON, or Trello. You can also view the report by OWASP top 10; this would be handy if your goal is to fix only with OWASP findings. Integration – you can use Detectify API to integrate with your applications or the following.
Slack, Pager Duty, Hipchat – get instantly notified JIRA – create an issue for the findings Trello – get the results in Trello board Zapier – automate workflows
A large number of tests – as mentioned earlier, it checks for more than 500 vulnerabilities, and some of them are:
SQL/Blind/WPML/NoSQL SQL injection Cross-site scripting (XSS) Cross-site request forgery (CSRF) Remote/Local File Inclusion SQL error Unencrypted login session Information leakages Email spoofing Email/user enumeration Broken session XPATH Malware
Don’t do everything alone – invite your team to perform and share the results Customize tests – every application is unique, so if necessary you can put the custom cookie/user agents/headers, change test behavior, and from different devices. Continuous Security updates – The tool is updated regularly to ensure all the latest vulnerabilities are covered and tested. For ex, just last week, more than ten new tests were updated. CMS Security – if you are running a blog, information website, eCommerce then most likely you will be using CMS like WordPress, Joomla, Drupal, Magento, and the good news is they are covered in the security test. Detectify performs CMS particular test to ensure your website is not exposed to online threats which may have arisen from them. Scan protected page – browse the page which is behind the login.
Getting Started with Detectify
Detectify offers 14 days FREE trial (no credit card required). Following, I will create a trial account and perform the security test on my website.
Fill the information on the trial account creation page and click Continue.
You’ll get an email confirmation to verify the account
Click “Verify the email to get it started,” and you will be redirected to the dashboard with a welcome tour screen.
You may be interested in navigating through the step-by-step guide or watching the video, but for now, I will close the window.
By now, you have your account created and ready to add the website to run the scan. On the dashboard, you will see a menu “Scopes & Targets,” click on that.
There are two ways to add the scope (URL). Choose the one you like. I will proceed by importing through Google Analytics.
Click “Use Google Analytics” and authenticate your Google account to retrieve the URL information. Once added, you should see the URL information.
This concludes you have added the URL to Detectify, and whenever ready, you can run the scan-on-demand or schedule to run it daily, weekly, or monthly.
Running a Security Scan
It’s a fun time now!
Let’s go to the dashboard and click on the URL you just added. Click “Start Scan” at right bottom
It will start the scan in seven steps as following and you should see the status of each
Starting Information gathering Crawling Fingerprinting Information analysis Exploitation Finalization
It will take some time (approx. 3-4 hours based on the website size) to run the full scan. You may close the browser, and you will get notification by email once the scan is finished. It took around 3.5 hours to complete the scan for Geek Flare, and I got this.
You can either click on email or login to a dashboard to view the report.
Exploring Detectify Report
Reporting is what a website owner or security analyst would be looking for. It’s essential as you will need to fix the findings that you see in the report. When you log in to the Dashboard, you will see your website list.
You can see the last scan date & timing, some findings, and overall score.
Red icon – high Yellow icon – medium Blue icon – low
High severity is dangerous, and it should always be the first to fix in your priority list. Let’s take a look at the detailed report. Click on the website from the dashboard, and it will take you to the overview page. Here you have two options under “Threat Score.” Either you can view the finding online or export them to PDF.
I exported my report in PDF, and it was 351 pages, that’s in-depth. A quick example of online findings, you can expand them to see the detailed information.
Each result is explained in clear and possible recommendations so if you are a security analyst; a report should give you enough information to fix them. OWASP top 10 reporting – if you are just interested in OWASP top 10 security items report then you can view them under “Reports” at the left navigation bar.
So go ahead and look into the report to see what you got to fix. Once you repair the finding, you can run the scan again to verify it.
Exploring Detectify Settings
There are some useful settings you may want to play around with it based on the requirement. Under Settings » basic Request limit – if you want Detectify to limit the number of requests it makes per second to your website you can customize here. By default, it’s disabled.
Subdomain – you can instruct Detectify not to discover subdomain for the scan. It’s enabled by default.
Setup recurring scans – change the schedule to run the security scan daily, weekly, or monthly. By default, it’s configured to run weekly. Under Settings » Advanced Custom cookie & header – supply your custom cookie and header for the test Scan from mobile – you can run the scan from different user-agent. Useful if you want to test like a mobile user, custom client, etc.
Disable specific test – don’t want to test some specific security items? You can disable it from here.
Over to you… If you are serious about finding security vulnerabilities from the hacker perspective, then give a try to Detectify. You can create a trial account to explore the features.
![]()
![]()


![]()
![]()
![]()
![]()

![]()


![]()
![]()
![]()

